Skip to content

Easy Space Hoop
Difficulty Level: Easy
Project Length: Medium
This project is a great one for beginners. Only one type of embroidery stitch, split stitch, is needed to complete this simple but colourful 'out of the this world' hoop.
To stitch this hand-embroidered space hoop you will need:
- Lazy May 'Super Space' embroidery pattern set
- 30cm x 30cm (12"x12") white or natural fabric (I have used 100% cotton in white)
- 7" embroidery hoop, needle, scissors
- Threads in the following colours, you can also find these colours (and many more) in our Brights thread bundle and Pastel thread Bundle
|
Colour
|
Madeira thread
|
DMC thread
|
|
Red
|
210
|
666
|
|
Yellow
|
0105
|
973
|
|
Orange
|
0204
|
970
|
|
Light Blue
|
0910
|
799
|
|
Bright Blue
|
1103
|
996
|
|
Dark Blue
|
0911
|
798
|
|
Light green
|
1210
|
955
|
|
Dark Green
|
1306
|
702
|
|
Light Purple
|
0802
|
210
|
|
Dark Purple
|
0712
|
553
|
|
Brown
|
2009
|
434
|
| Grey | 0901 | 3747 |
If you are new to embroidery you can find a guide to the basics, including all the equipment and getting it set up here.
You will also find guides to all the stitches mentioned in this pattern here.
Preparation
Carefully cut out the astronaut, space and Saturn designs from the transfer sheet. You can use the outer ring of your hoop to make sure the design will fit correctly, lay all the transfers in position, then place the outer ring on top of the fabric, make sure all the transfers fit with the hoop and that there is a gap of rough 1cm around the edge.
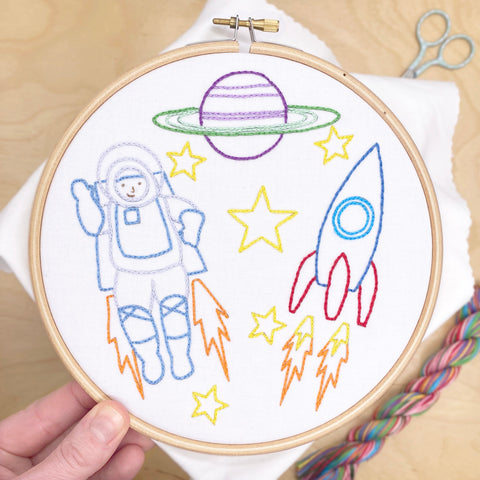
Now follow the instructions on the pack to iron them onto your fabric in the positions shown below.

Next cut out one large and 4 small stars and iron them one by one into the positions show.

Mount the fabric in your hoop making sure the fabric is straight and taut like a drum skin. Tighten the screw fully using pliers or a screw driver if you need to.

Stitching Notes
Each element of the space design is stitched using 4 strands of thread.
You will need to separate your thread and select 4 of the 6 strands before you start to stitch. If you need some help with this, you can find my guide here.
Split stitch is used for every element of the pattern, if you have not worked split stitch before you can see a guide below.
Split Stitch

Bring your needle up through the fabric at the start of your pattern line and then back through the fabric to make a simple stitch. Push the needle back up through the fabric in the middle of the previous stitch, splitting the threads on either side of the needle b).
Here you can see a close up of how split stitch looks on the planet design. Keep your stitches evenly spaced and pull the thread tight, making sure not to pucker the fabric.

Colours
Here you can see a close up of the stitched design, use this image to see which colours are used where in the pattern.

Now simply work your way around the pattern covering all of the lines until the pattern is complete.


The pattern used in this project was 'Super Space' please click the link below for more details.

You may also be interested in...